How to Set Up HTTPS for Self-Hosted Websites (SSL & Cloudflare Guide)
HTTPS is no longer optional for modern websites. Browsers actively warn users when a site is not secure,
search engines prefer HTTPS-enabled websites, and sensitive data must be encrypted in transit.
If you are running a self-hosted website on a VPS, home server, or private cloud,
setting up HTTPS correctly is a critical step.
This guide explains how HTTPS works, why SSL certificates are required,
and how to set up HTTPS for self-hosted websites using both traditional SSL certificates
and Cloudflare as a security layer.
What Is HTTPS and Why It Matters
HTTPS stands for HyperText Transfer Protocol Secure.
It is the secure version of HTTP, where data exchanged between the browser and the server
is encrypted using SSL or TLS.
Without HTTPS, data such as login credentials, form submissions, and session cookies
can be intercepted by attackers.
HTTPS ensures data confidentiality, integrity, and authentication.
What Is SSL and TLS?
SSL (Secure Sockets Layer) and TLS (Transport Layer Security) are cryptographic protocols
used to secure communication over the internet.
While SSL is the older term, modern implementations use TLS.
However, the term SSL certificate is still commonly used.
An SSL certificate verifies the identity of your website
and enables encrypted communication between the server and the client.
How HTTPS Works
When a user visits an HTTPS-enabled website, the browser and server perform an SSL handshake.
During this process, the server presents its SSL certificate,
the browser verifies it, and both sides agree on encryption keys.
Once the handshake is complete, all data exchanged is encrypted.
This prevents eavesdropping, tampering, and man-in-the-middle attacks.
Requirements for Enabling HTTPS on a Self-Hosted Website
Before setting up HTTPS, ensure you have the following:
- A registered domain name
- A self-hosted server (VPS, home server, or cloud instance)
- Access to your web server configuration (Nginx or Apache)
- Port 443 open on the server or accessible via a tunnel
Method 1: Setting Up HTTPS Using a Free SSL Certificate
One of the most common ways to enable HTTPS is by using a free SSL certificate.
Free certificates are trusted by all modern browsers and are suitable for most websites.
Step 1: Install an SSL Certificate
You can generate and install a free SSL certificate using an automated certificate authority.
These certificates are typically valid for 90 days and can be renewed automatically.
The certificate installation process verifies your domain
and configures your web server to use HTTPS.
Step 2: Configure Your Web Server
After installing the certificate, update your web server configuration
to listen on port 443 and use the certificate and private key files.
This enables encrypted connections.
You should also configure HTTP to HTTPS redirection
so all traffic is automatically secured.
Step 3: Test HTTPS
Once configured, access your website using https://
and verify that the browser shows a secure lock icon.
Ensure there are no mixed content warnings.
Method 2: Setting Up HTTPS Using Cloudflare
Cloudflare provides an alternative and often simpler way
to enable HTTPS for self-hosted websites.
Cloudflare acts as a reverse proxy between users and your server.
With Cloudflare, your server does not need to be directly exposed to the internet,
and SSL is handled at the edge.
Step 1: Add Your Website to Cloudflare
After creating a Cloudflare account,
add your domain and update your domain’s nameservers
to Cloudflare-provided nameservers.
This allows Cloudflare to manage DNS and traffic routing for your website.
Step 2: Enable SSL/TLS in Cloudflare
In the Cloudflare dashboard, enable SSL/TLS and choose the appropriate mode.
For self-hosted servers, the recommended option is Full or Full (Strict).
Full mode encrypts traffic between the browser and Cloudflare,
and also between Cloudflare and your server.
Step 3: Install an Origin Certificate (Optional but Recommended)
Cloudflare allows you to generate an origin certificate
that is trusted only by Cloudflare.
This certificate is installed on your server
and secures the connection between Cloudflare and your origin server.
This approach improves security and avoids exposing your server directly.
Step 4: Force HTTPS
Enable automatic HTTPS redirection in Cloudflare
to ensure all visitors use secure connections.
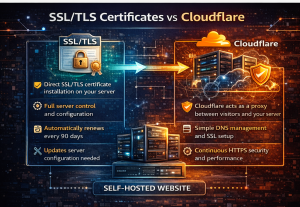
SSL vs Cloudflare HTTPS: Which Should You Use?
Traditional SSL certificates are ideal when you want direct control
over your server and traffic.
Cloudflare HTTPS is better when security, performance,
and ease of setup are priorities.
Many developers combine both approaches
by using Cloudflare with an origin SSL certificate.
Common Mistakes to Avoid
One common mistake is enabling HTTPS
without updating internal links and assets.
This causes mixed content warnings and breaks security.
Another mistake is using an incorrect SSL mode in Cloudflare,
which can result in redirect loops or security errors.
How HTTPS Improves SEO and Trust
Search engines prioritize secure websites,
and HTTPS is a confirmed ranking factor.
Browsers also display warnings for non-secure websites,
which reduces user trust.
Enabling HTTPS improves credibility,
protects user data,
and ensures compliance with modern web standards.
Conclusion
Setting up HTTPS for a self-hosted website is essential in today’s web environment.
Whether you choose a traditional SSL certificate or Cloudflare-based HTTPS,
securing your website protects users and improves performance and SEO.
By following the correct steps and avoiding common mistakes,
you can confidently deploy HTTPS on your self-hosted server
and provide a secure browsing experience for your visitors.